How Can We Help?
Moving your class up a year
This guide gives you step-by-step instructions on moving your class up a year. All the methods outlined here keep all your pupil’s progress data from earlier years.
If the children in your classes remain the same from year to year, then follow the steps outlined in the Renaming the class section.
If you only need to move a few children between classes then follow the steps in the Moving students between classes section.
If your school mixes the classes when moving children up a year, then follow the instructions in the Merge children into new classes section.
If you need to delete a class you can follow the instructions in the Removing data section.
Please refer to the Choosing courses for your classes guide for detailed instructions on choosing the most appropriate course for each of your classes, based on their coding experience.
Renaming the class
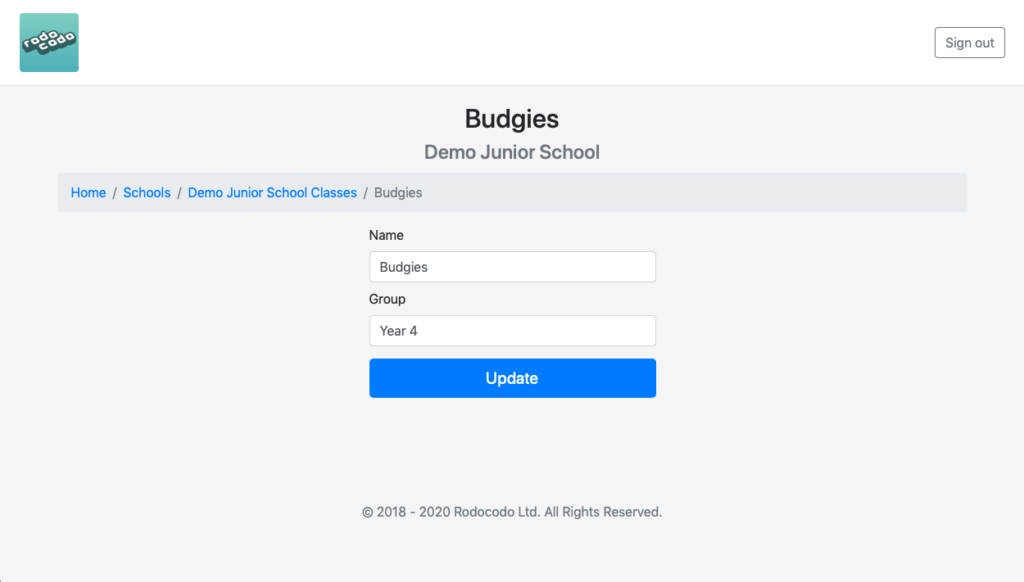
If the children in your classes will remain the same. e.g. From Year 3, to Year 4. You simply have to rename the class name, rename the year group, and update the course.
- Log in at https://www.rodocodo.com/admin
- Go to the Classes section.
- Click on the Edit button for the class you want to change.
- Change the Name field (e.g. from Budgies to Owls).
- Change the Group field (e.g. from Year 4 to Year 5).
- Click the Update button. You are now returned to the Classes section.
- Change the Course using the drop down menu. (Remember to read the course selection guide to know which course to use for your class!)
- Repeat for all the classes.
Moving students between classes
If you need to move a few individuals between classes, then do the following:
- Log in at https://www.rodocodo.com/admin
- Go to the Classes section.
- Click on the Students button.
- Click on the Edit button for the child you wish to move class.
- Change the class using the dropdown menu.
Note: If you have many classes to update and don’t want to do it manually, then follow the instructions below.
Merge children into new classes
If you need to merge children into new classes. So for example, if you have two year 3 classes and the children will be merged into two new classes, when they move up to year 4. Note: For more detailed instructions on how to set up the file so it’s ready for import you can find them here.
- Log in at https://www.rodocodo.com/admin
- Go to the Classes section.
- Delete any classes that are no longer needed. e.g. The Year 6 classes that have just left.
- Click on the Import / Update Classes button.
- Click on the button below Upload file and select your CSV file to upload.
- Click on the “Import / Update student accounts” button.
- Wait.
If there are errors in the file, the page will display an error message stating which line(s) of the CSV has the problem. Please fix the errors and save your changes then go back to Step 4 to upload your updated file. If you’re unable to solve the issue then please get in touch with us at [email protected], and we’ll be happy to help.
If there are no errors the system will successfully import your classes.
If duplicates are found it will inform you of them and you’ll need to manually update these. This may involve manually moving a child to their new class using the instructions above in Moving students between classes.
By default, the system chooses a course, but you should change this. The changing course guide can be found here.
Removing data
If you no longer require a class (e.g. the Year 6 class that have just left), then you can delete that class.
- Log in at https://www.rodocodo.com/admin
- Go to the Classes section.
- Click the “Delete” button for the class you wish to remove. Be careful to ensure you are deleting the correct class as it is not reversible!